
My Profile
The My Profile section allows you to configure and manage your account settings, shipping defaults, payment methods, carrier preferences, saved package details, and operational settings.
Properly configuring your profile helps streamline shipment creation and improves shipping efficiency.
Open the My Profile page from the left-side menu or directly at transportal.parcelinternational.com/user/profile.
Step 1: Manage your profile and default shipment addresses
- Use this section to configure your default sender and billing addresses.
Change Sender Address
- Click the Change sender address button to update your default shipment sender information.
- This address is automatically applied as the sender address when creating new shipments.
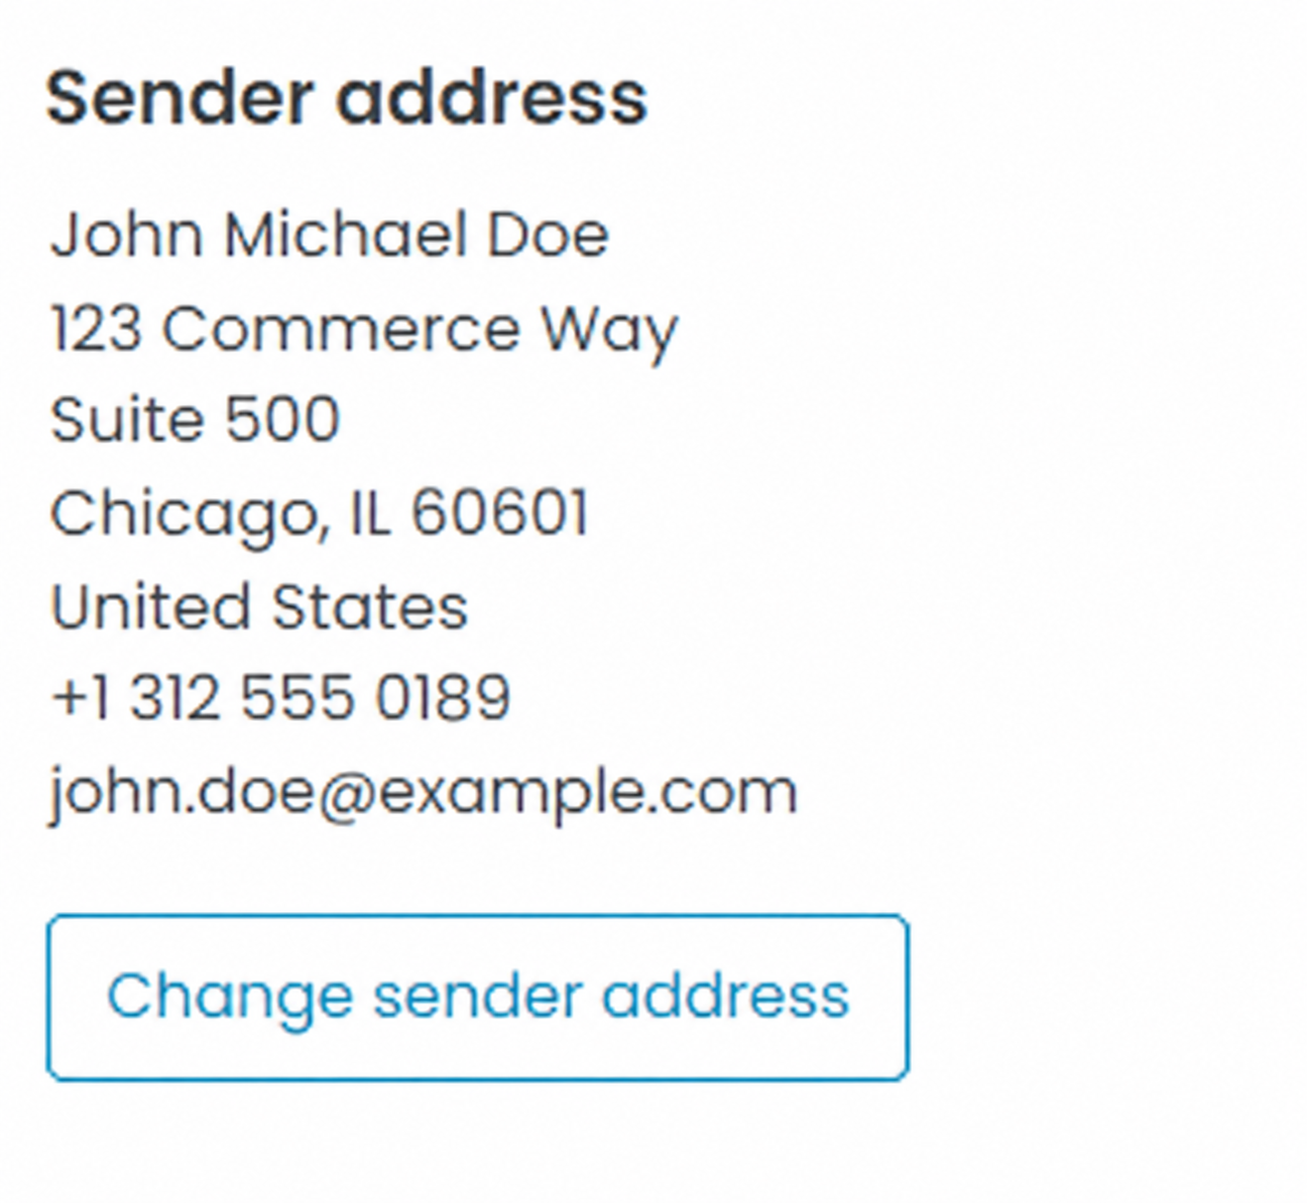
Sender Address Details
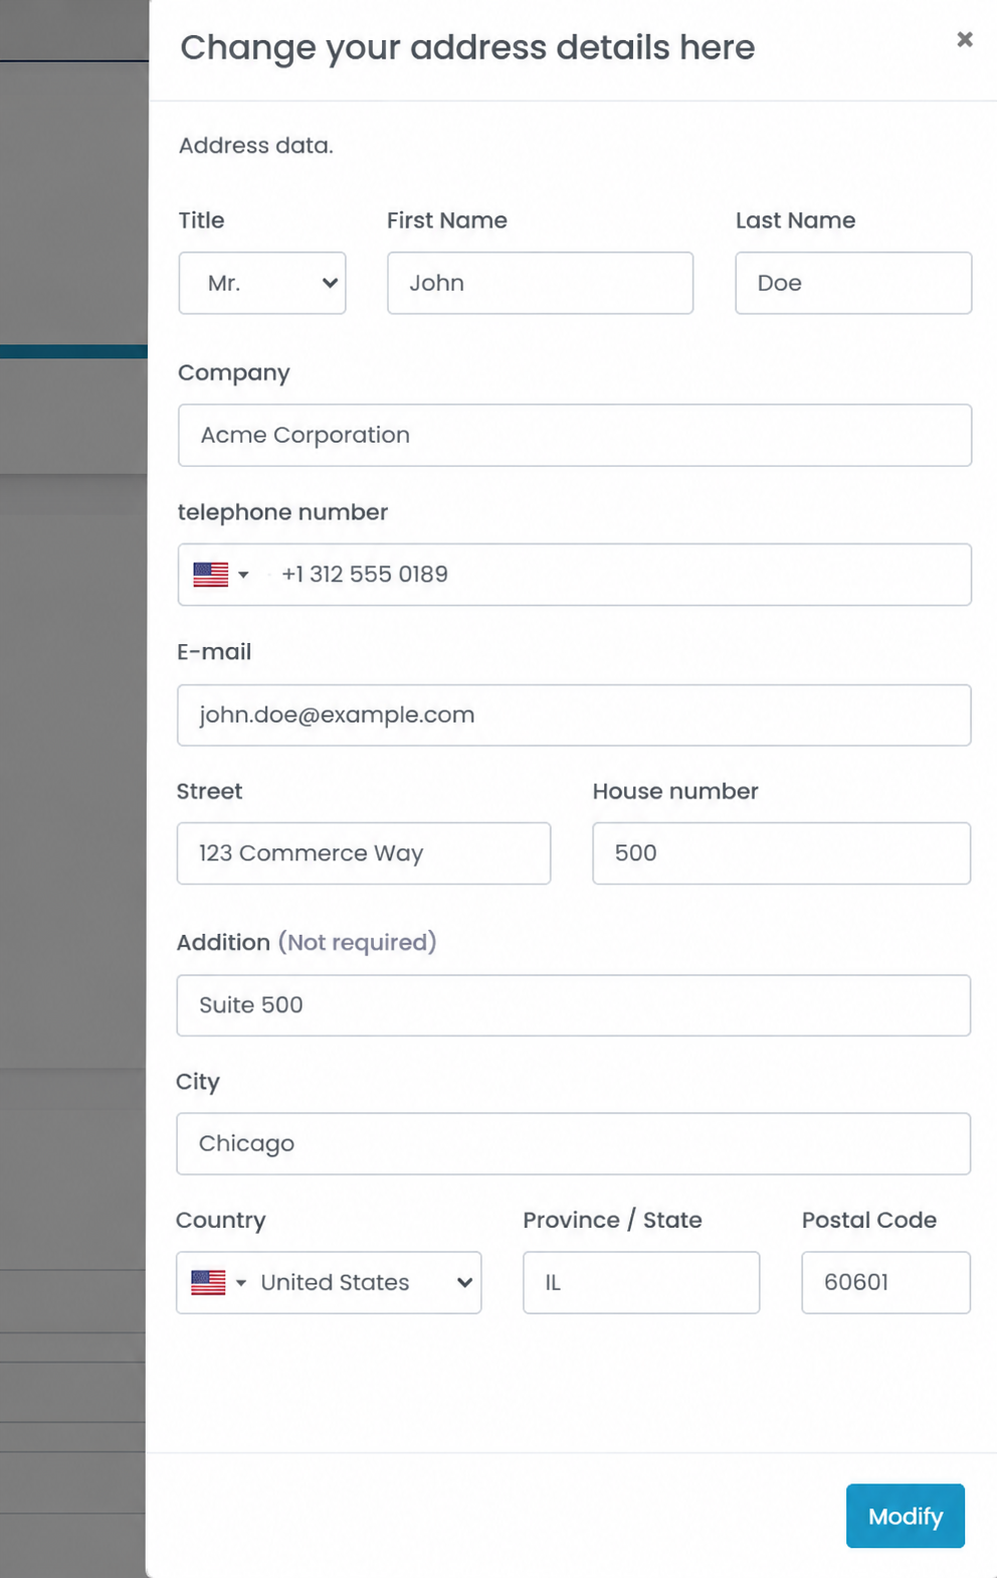
Full Name & Email
- Your account name and email address are used for shipment confirmations and tracking updates.
Company Name
- Enter your registered business or company name if shipping on behalf of a business.
Phone Number
- Ensure the contact phone number is accurate.
- Carriers may use this number for pickup coordination or delivery communication.
Street & House Number
- Enter the physical pickup address details.
Postal Code & City
- These values are important for shipment rate calculations and transit time estimations.
Country
- Select the default shipment origin country.
Change Billing Address
- Click the Change billing address button to update your billing information.
- Billing addresses are used only for invoicing and financial purposes.
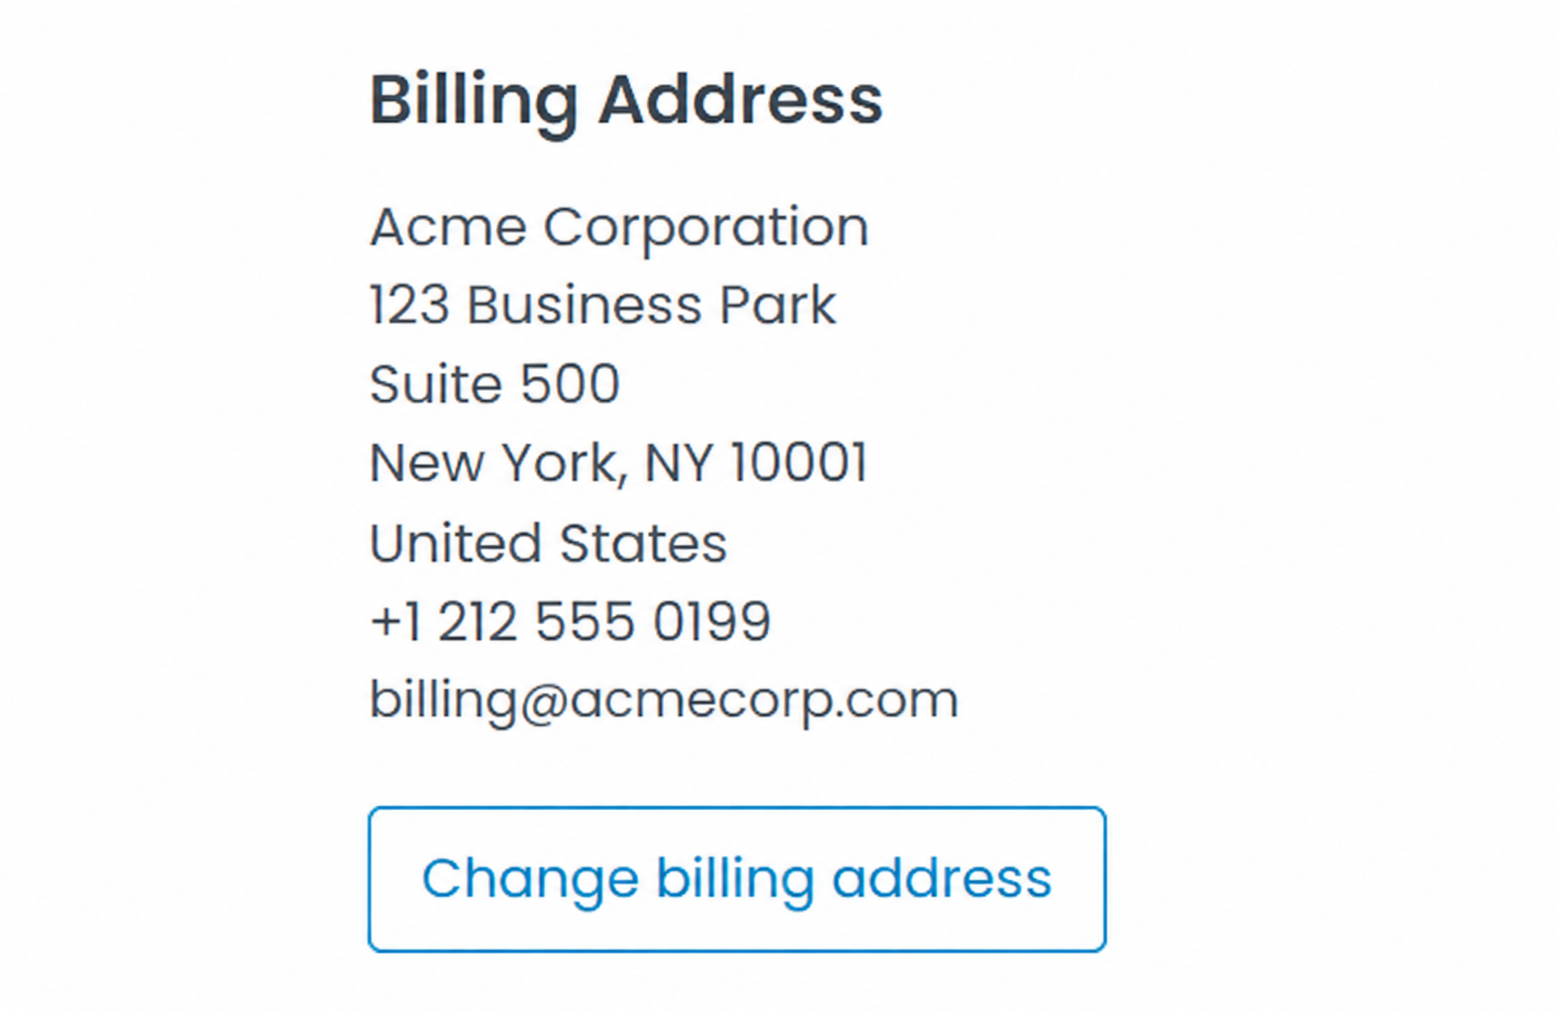
Billing Address Details
- The billing address appears on invoices generated for your account.
- Ensure billing details match the legal entity responsible for payments.
- Country information is important for VAT and tax calculations.
Tips & Tricks
- Always verify postal code and city details to prevent shipment label issues.
- After updating address details, click the Modify button to save your changes.
Step 2: Update shipping information
- The Shipping Information section stores important business identifiers used for customs documentation and invoicing.
- Accurate information helps reduce customs delays for international shipments.
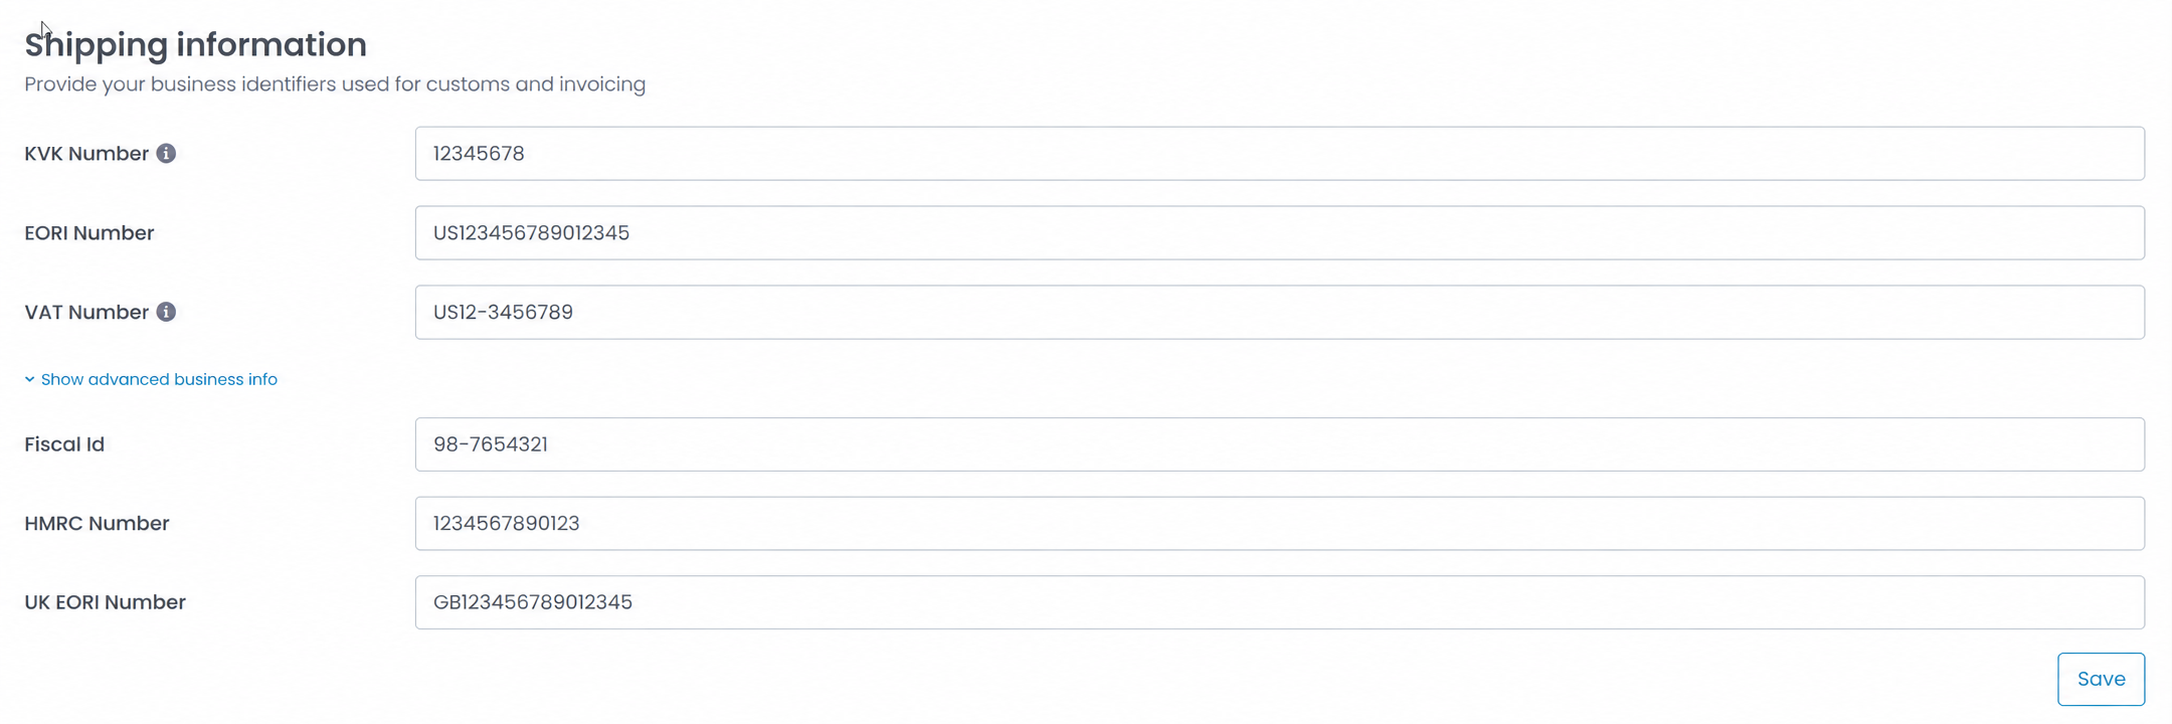
Standard Business Identifiers
KVK Number
- Your Chamber of Commerce registration number.
EORI Number
- Required for importing and exporting goods internationally.
VAT Number
- Used for tax processing and invoicing.
Advanced Business Information
- Additional fields may be available depending on regional requirements.
Fiscal ID
- Regional tax identification number.
HMRC Number
- Required for UK customs and taxation processes.
UK EORI Number
- Required for moving goods into or out of the United Kingdom.
- After updating business identifiers, click the Save button.
Step 3: Manage saved shipment contents
- The Contents section allows you to save frequently used shipment package templates.
- Saved content templates reduce manual entry during shipment creation.
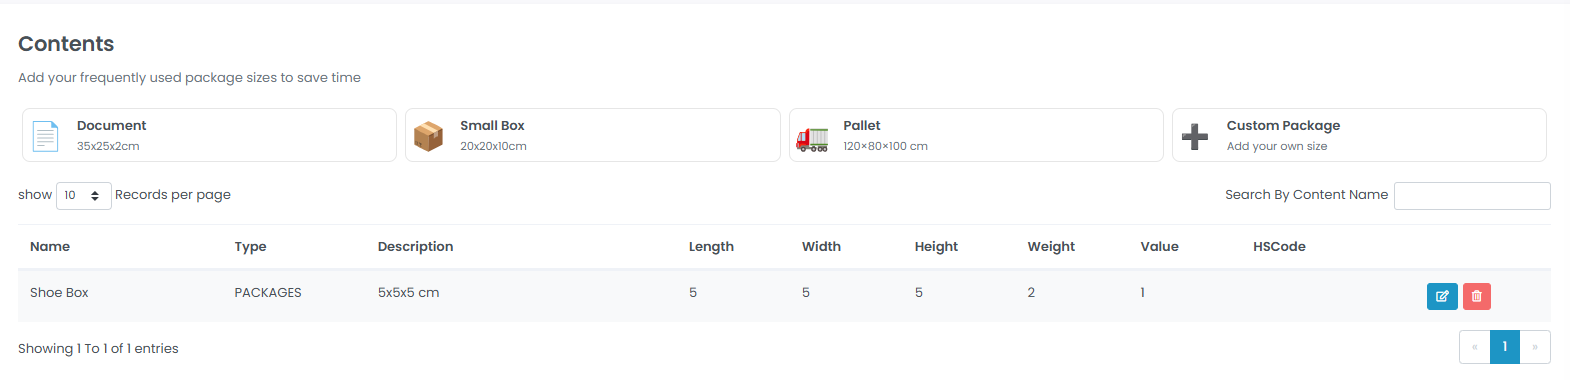
Preset Package Sizes
Common preset package sizes may include:
- Document - 35 x 25 x 2 cm
- Small Box - 20 x 20 x 10 cm
- Pallet - 120 x 80 x 100 cm
- Custom Package - create your own package dimensions
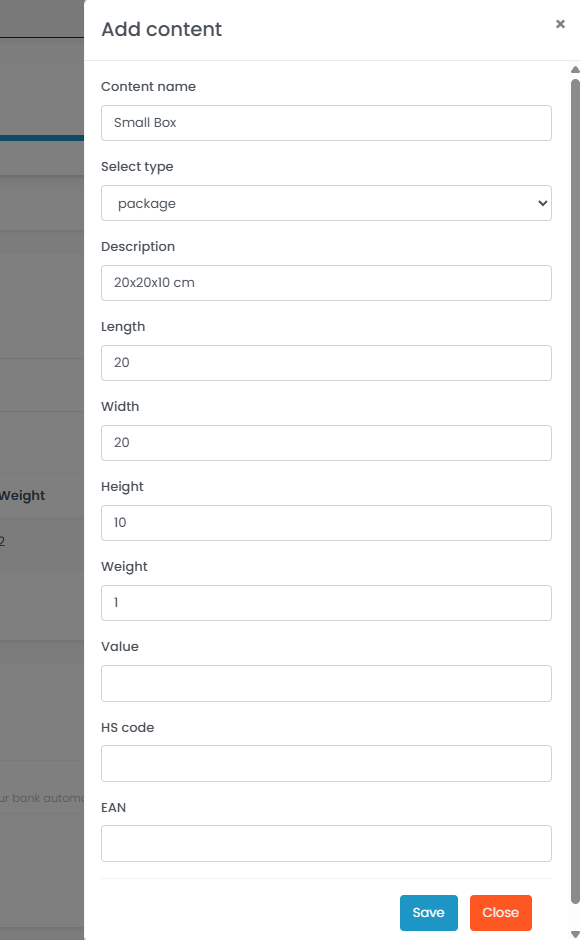
Manage Content Templates
Search Templates
- Use the search field to quickly locate saved package templates.
Edit Templates
- Click the blue pencil icon to modify saved content details.
Delete Templates
- Click the red trash icon to remove content templates.
Content Specifications
Saved package templates may include:
- Length
- Width
- Height
- Weight
- Value
- HS Code
- EAN
- Package type
Tips & Tricks
- Use accurate HS codes to reduce customs delays.
- Use descriptive template names for easier searching.
Step 4: Configure payment details
- The Payment Details section allows you to manage your preferred payment method.

Available Payment Methods
Direct Pay
- Pay immediately for shipments using a credit or debit card.
Invoice
- Receive invoices for shipment payments weekly.
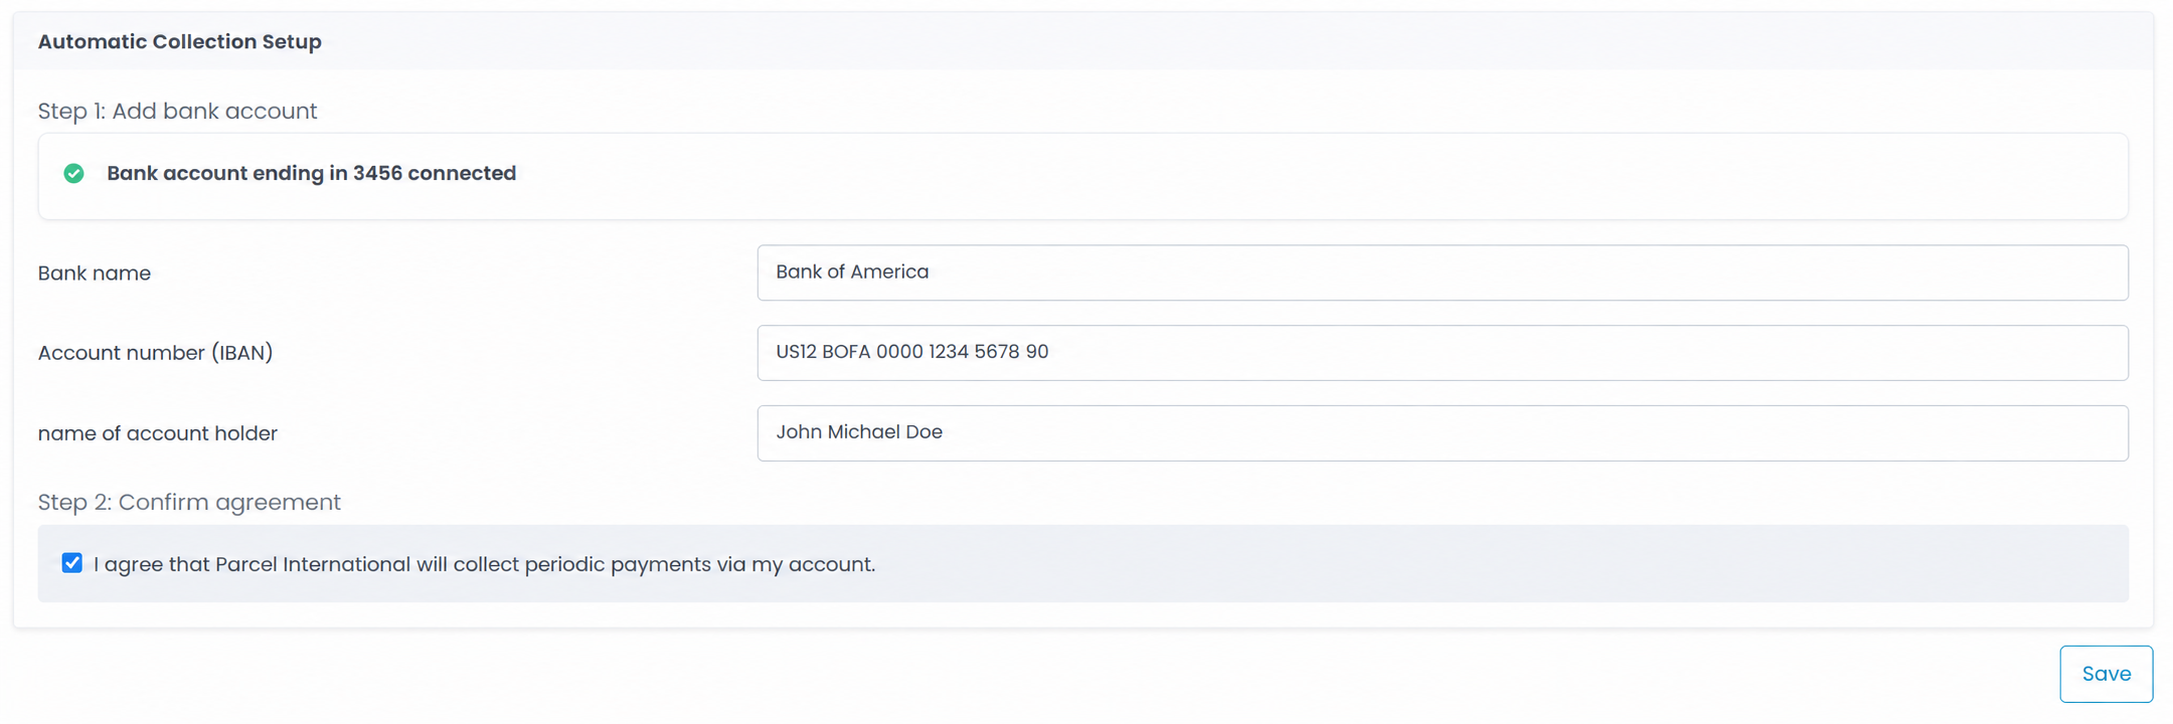
Automatic Collection
- Payments are automatically collected from your connected bank account.
Automatic Collection Setup
If using automatic collection, configure the following details:
- Bank name
- IBAN / Account number
- Account holder name
- Enable the authorization checkbox to allow automatic payment collection.
Tips & Tricks
- Payment methods can be changed at any time.
- Always verify IBAN details carefully before saving.
Step 5: Manage carrier list
- The Carrier List section allows you to control which shipping carriers are available during shipment booking.
- Only the carriers enabled in this section will be used to retrieve shipment rates and available shipping services when creating shipments.
- This helps simplify rate selection and ensures shipment options match your preferred logistics providers.
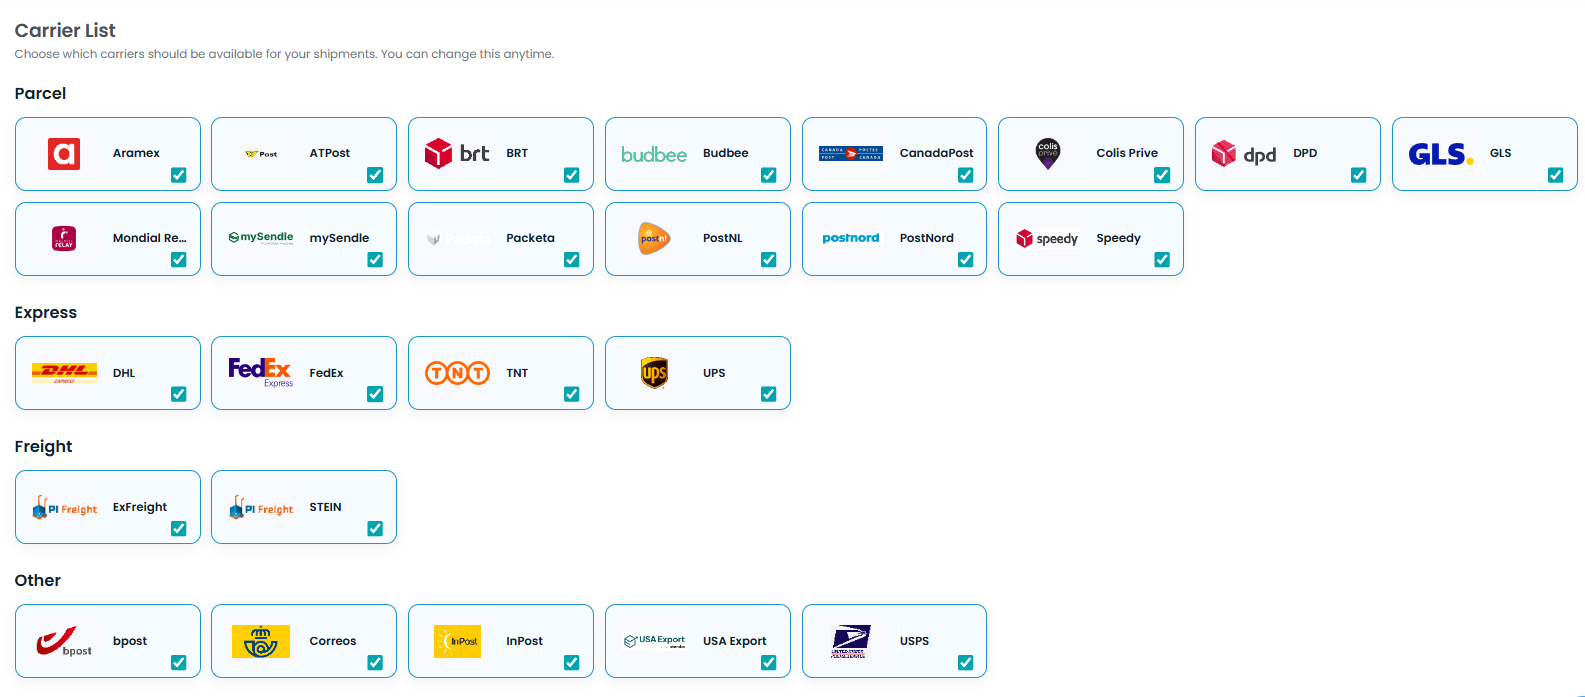
Activate Carriers
- Enable carriers using the checkbox displayed on each carrier card.
- Active carriers become available during shipment booking.
Deactivate Carriers
- Disable carriers to remove them from shipment rate results.
Tips & Tricks
- Disable unused carriers to simplify shipment rate selection.
- Keep different carrier categories enabled for various shipment types such as parcel, express, and freight.
Step 6: Configure additional options
- Additional Options allow you to preconfigure shipment handling and operational preferences.
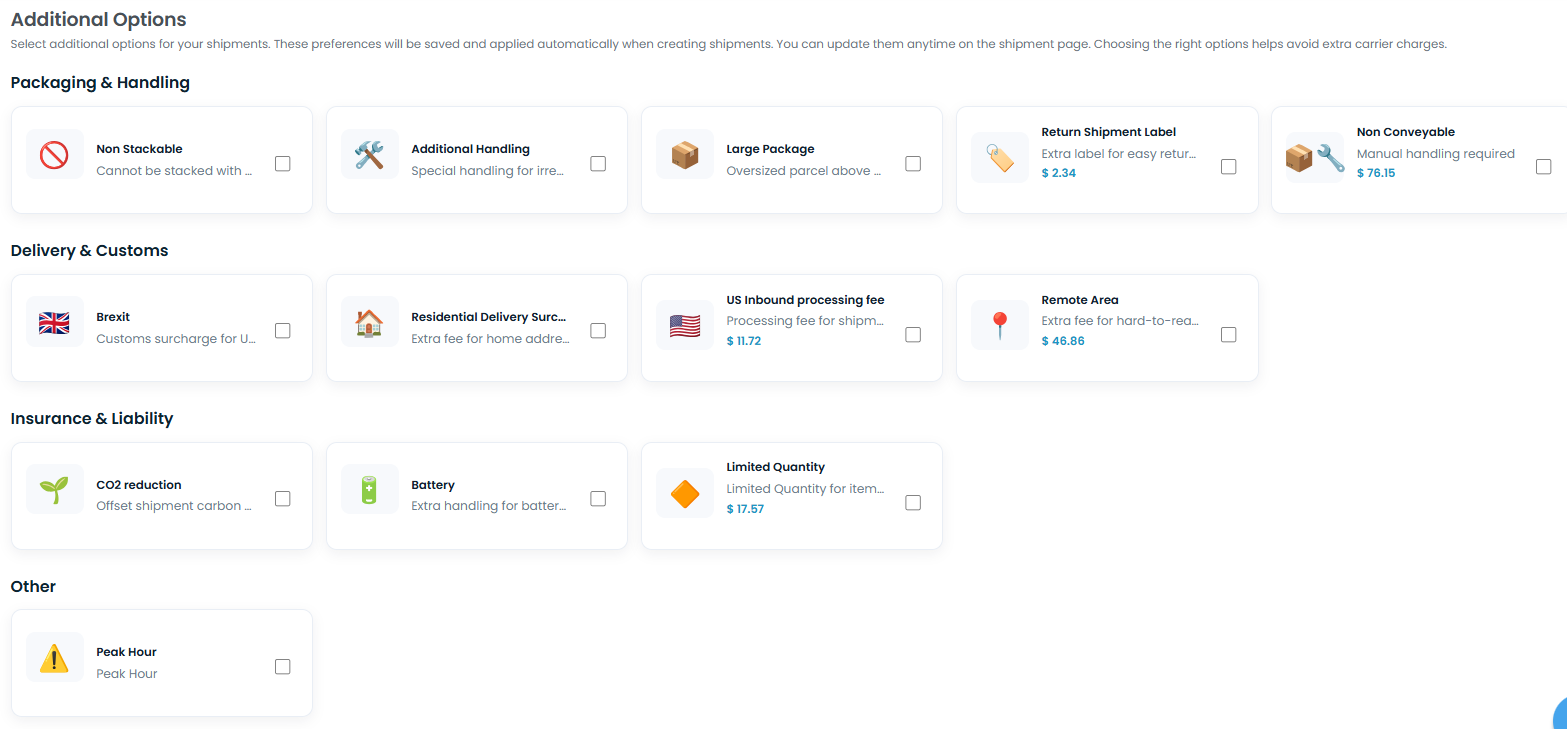
Packaging & Handling
- Configure default package handling preferences.
Delivery & Customs
- Configure customs and destination-related shipment preferences.
Insurance & Liability
- Configure insurance and shipment safety options.
Automatic Application
- Enabled options are automatically applied to future shipments.
- Individual shipments can still override these defaults when necessary.
Step 7: Configure settings
- The Settings section allows you to define operational defaults.
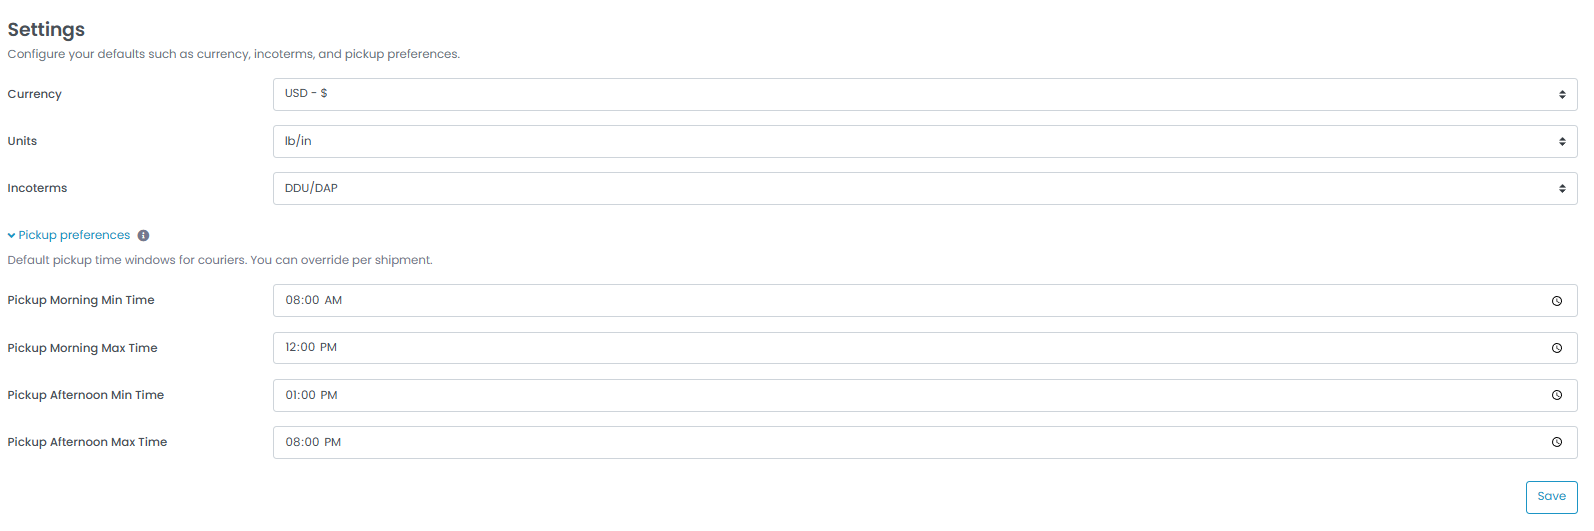
General Defaults
Currency
- Select the default billing and quotation currency.
Units
- Select the preferred shipment measurement units.
Incoterms
- Configure default international commercial terms.
DDU/DAP
- Receiver pays duties and taxes.
DDP
- Sender pays duties and taxes.
Pickup Preferences
- Configure default pickup time windows for morning and afternoon collections.
- Click the Save button after updating settings.
Step 8: Configure options
- The Options section allows you to manage return handling preferences and communication settings.

Return Request Handling
Automatically Approve
- Return requests are approved automatically.
Automatically Deny
- Return requests are denied automatically.
Checking Manually
- Review and approve return requests manually before processing.
- When this option is enabled, all incoming return requests require manual verification and approval.
- You can review, manage, approve, or reject return requests from the Return Shipments section.
Subscription Preferences
Newsletter
- Enable notifications for product updates, new features, and company announcements.
- Click the Save button after updating your preferences.

Tips & Tricks
- Keep profile information updated regularly to avoid shipment processing issues.
- Configure accurate customs identifiers for international shipments.
- Save frequently used shipment templates to reduce booking time.
- Review payment settings periodically to ensure uninterrupted shipment processing.
- Use carrier activation settings to simplify shipment rate comparisons.
- Configure default shipment settings carefully to minimize manual shipment adjustments.
This guide is about the customer portal. No account yet? Create one for free.
Still stuck?
Our support team is here for you 24/7.